How to Steam Milk for Latte Art — Silky Microfoam Every Time
You've watched the tutorials. You know the theory. But every time you steam your milk it comes out either too bubbly, too thin, or weirdly separated — and your latte art suffers for it before you've even started pouring.
Here's the thing: milk texture is the foundation of every latte art shape. It doesn't matter how good your pour technique is — if your milk isn't right, your heart will have soft edges, your tulip layers will bleed, and your rosetta will look like a mess. Every single shape post on this blog opens with the same section: milk texture. That's not a coincidence.
A little science makes the rest click. Microfoam is mostly milk protein doing the work — the casein and whey proteins wrap around the tiny air bubbles you whip in and hold them stable, while the fat (around 3.2–3.5% in whole milk) adds the gloss and body that makes it look like wet paint. That's why whole milk is the most forgiving to learn on: skim foams up big and stiff like shaving cream, and anything below about 1.5% fat struggles to hold fine texture. Get the protein and fat working for you and the four fixes below are mostly about timing.
These are the four mistakes that cause almost every bad microfoam — and how to fix them.

You're Stretching for Too Long (or Not Long Enough)
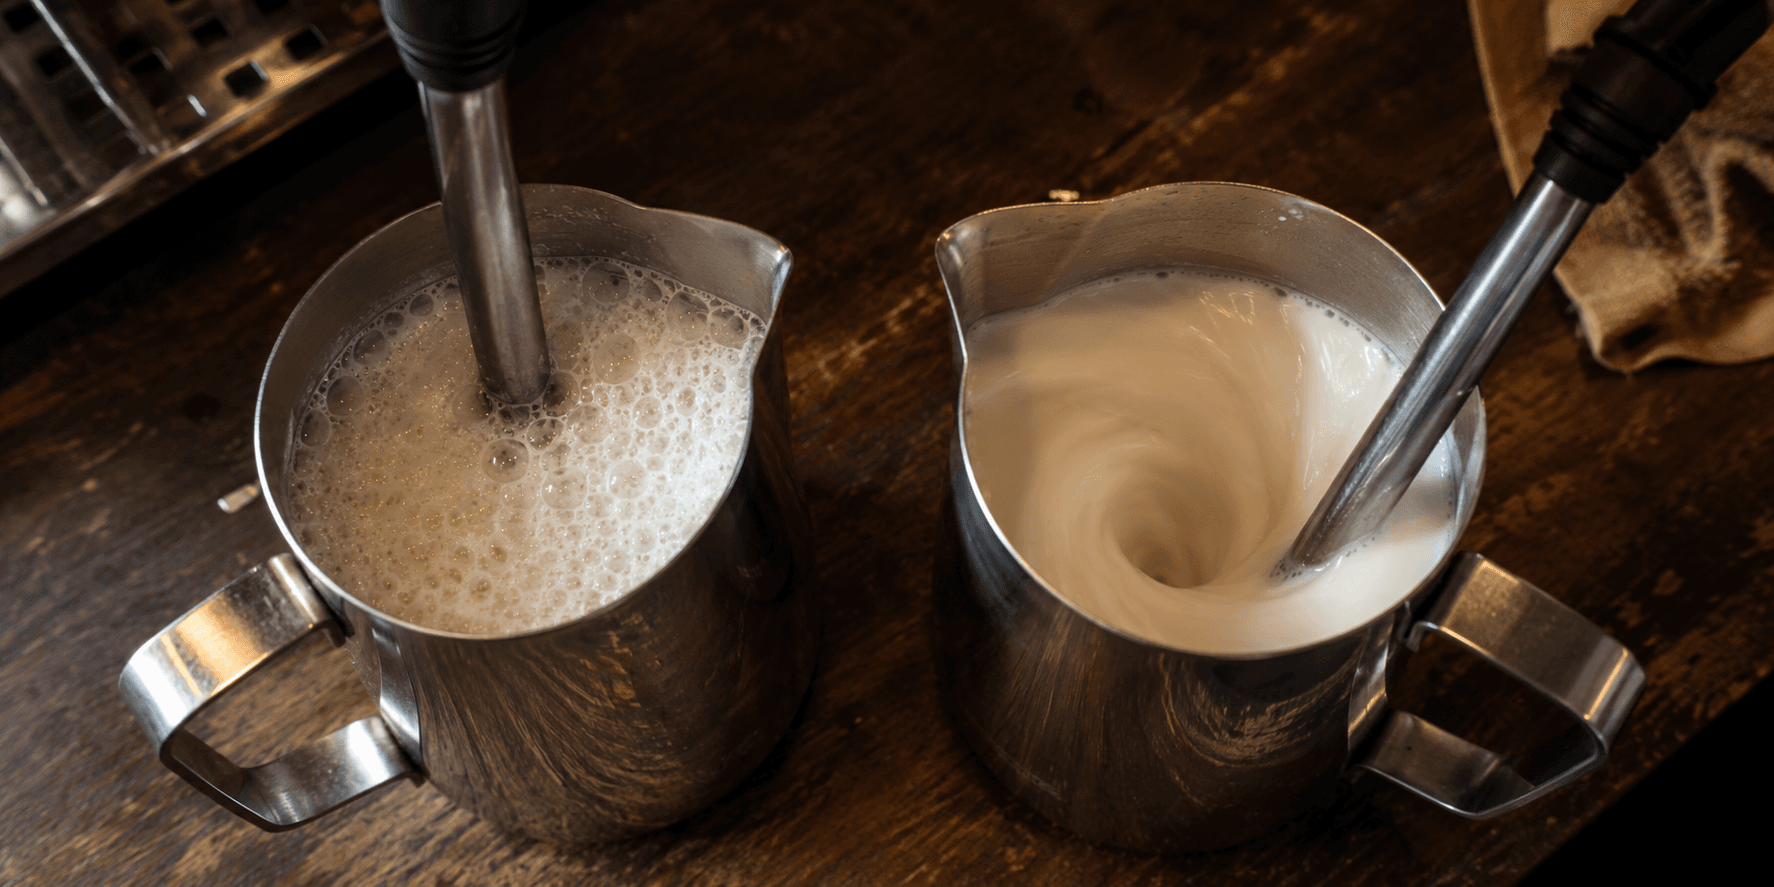
Stretching is the phase where you introduce air into the milk — that paper-tearing or hissing sound you hear when the steam wand is just below the surface. Get it right and you build the foundation for silky microfoam. Get it wrong and you end up with either flat, watery milk or a pitcher full of large bubbles. For a latte or flat white you're only adding a small amount of air — roughly 20–30% in volume — so this phase is a brief whisper of air, not the deep aeration you'd use for a dry cappuccino.
The catch is that home machines like the Sage Barista Express are less powerful than professional steamers. A professional machine might need 2-3 seconds of stretching. Your home machine likely needs 5-8 seconds — but the exact duration depends on how much milk you're steaming.
More milk in the pitcher = the temperature rises slower = you can stretch slightly longer. Less milk = temperature rises faster = stop sooner.
The fix: Fill the pitcher only to the base of the spout — about a third full — so the milk has room to expand as you stretch. Listen for the paper-tearing sound and keep the wand just below the surface — about 1cm in from the edge, tip barely submerged. Stop stretching as soon as the pitcher feels warm to the touch (around 37°C, body temperature). After that point you're just adding heat, not air. If you hear large bubbling sounds, the wand has gone too deep — bring it back up.
Brew · Brew's contrast score reflects this directly — too much air creates large bubbles that break up the milk surface and lower contrast between foam and espresso.

You're Steaming to the Wrong Temperature
This is the mistake that's hardest to feel without a thermometer. Under-steamed milk (below 55°C) is thin and watery — it won't hold a shape and sinks straight into the espresso. Over-steamed milk (above 70°C) scalds the proteins, tastes burnt, and loses the natural sweetness that makes steamed milk pleasant to drink. It also goes dull and grey rather than bright and glossy.
The usable window is roughly 55-65°C, and there's a trade-off across it: the cooler end (55-60°C) actually produces the finest microfoam, because the hotter milk gets, the more its proteins expand and the larger the bubbles become. For most home pours 60-65°C is the practical sweet spot — fluid and pourable, hot enough to hold structure, and hot enough to be enjoyable to drink. But if your foam keeps coming out a little coarse, try stopping a few degrees sooner.
The fix: Use a thermometer until you've calibrated your hands to the feeling. At 60-65°C the pitcher should be uncomfortably hot to hold for more than a second or two — not just warm, but genuinely hot. On a Sage or similar home machine, this typically means steaming for 20-30 seconds total depending on milk volume. Stop before you think you need to — the temperature continues rising slightly after the steam stops.
Brew · Brew's definition score picks up temperature errors — milk that's too thin produces shapes with no structure or definition, while over-steamed milk creates a dull surface that flattens contrast.

You're Skipping the Whirlpool
This is the step most home baristas omit entirely — and it's the difference between microfoam and foam. The whirlpool (also called the roll) is a fast circular vortex you create in the milk during the heating phase, after stretching is done. It folds the large bubbles you introduced during stretching into the milk, breaking them down into the tiny uniform bubbles that create that smooth, glossy, wet-paint texture.
Without the whirlpool, those large bubbles just sit on top of the milk. You end up with a foamy layer floating over thinner milk below — exactly what makes latte art edges soft and undefined.
The fix: After the stretching phase, submerge the wand slightly deeper and angle the pitcher so the milk spins in a fast, tight vortex — like water going down a drain. Keep this going until you reach your target temperature. You should see the surface become smoother and more glossy as the whirlpool does its work. If the surface is still visibly bubbly when you stop, the whirlpool wasn't fast enough or long enough.
Brew · Brew's definition and contrast scores both reflect whirlpool quality — a bubbly surface is the clearest sign this step was skipped or rushed.
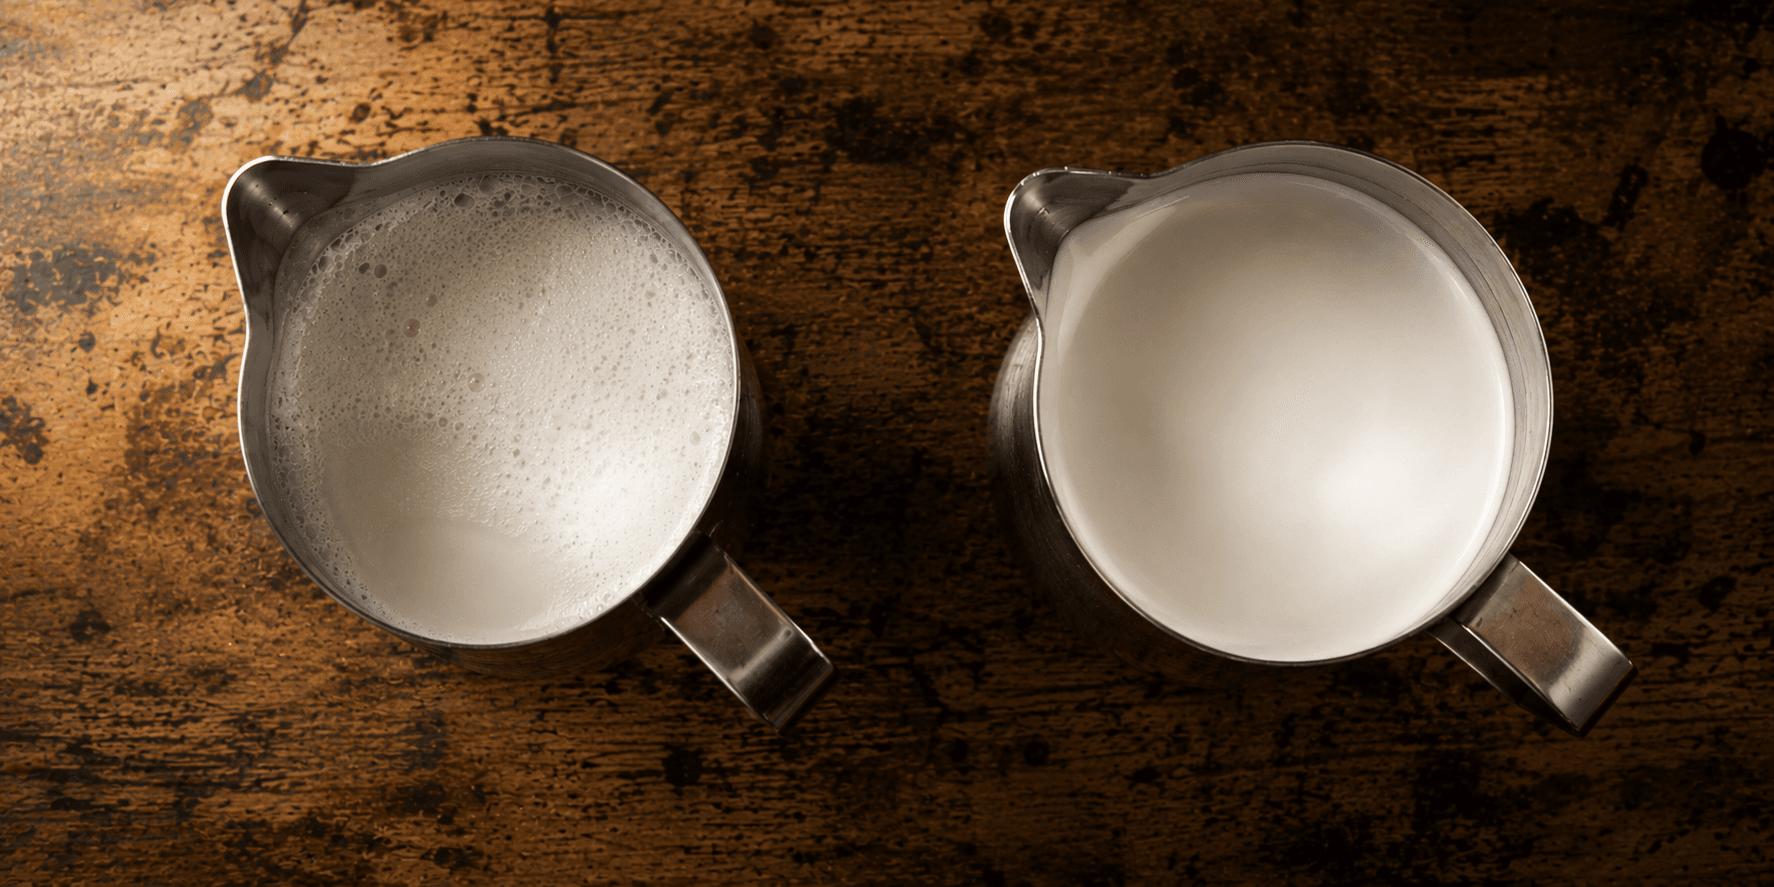
You're Not Polishing Before You Pour
You've stretched correctly, hit the right temperature, and done the whirlpool. But there's one final step between the steam wand and the cup — polishing. This means tapping the pitcher firmly on the counter to pop any remaining surface bubbles, then swirling vigorously to keep the milk moving and integrated.
Skip this and the milk separates in the 10-15 seconds between steaming and pouring — the foam floats to the top, the liquid sinks to the bottom, and the glossy texture you worked for disappears.
This step also explains something that confuses many home baristas: why two cups steamed from the same pitcher can score differently. If you pour the first cup immediately and the second cup 20-30 seconds later, the milk in the second cup has had time to separate — lower contrast, softer edges, worse score.
The fix: After steaming, tap the pitcher twice firmly on the counter. Then swirl in tight circles until the surface looks like wet paint — smooth, glossy, no visible bubbles. Pour immediately. If you're making two cups from one pitcher, swirl again between pours.
Brew · Brew's contrast score is the most sensitive to this — a low contrast score on an otherwise decent pour is almost always a polishing problem.
Good Milk Makes Every Shape Better
Every shape in Brew's curriculum — Heart, Tulip, 4-Tulip, Rosetta, Phoenix Tail, Swan — depends on the same silky microfoam foundation. When Brew flags "Milk too thick" or "Milk too thin" on your pour, this is the post to come back to. Fix your milk and your scores improve across the board, without changing anything else about your technique.
Try Brew free — a pour every day, no card →